Managing Controller Source Code
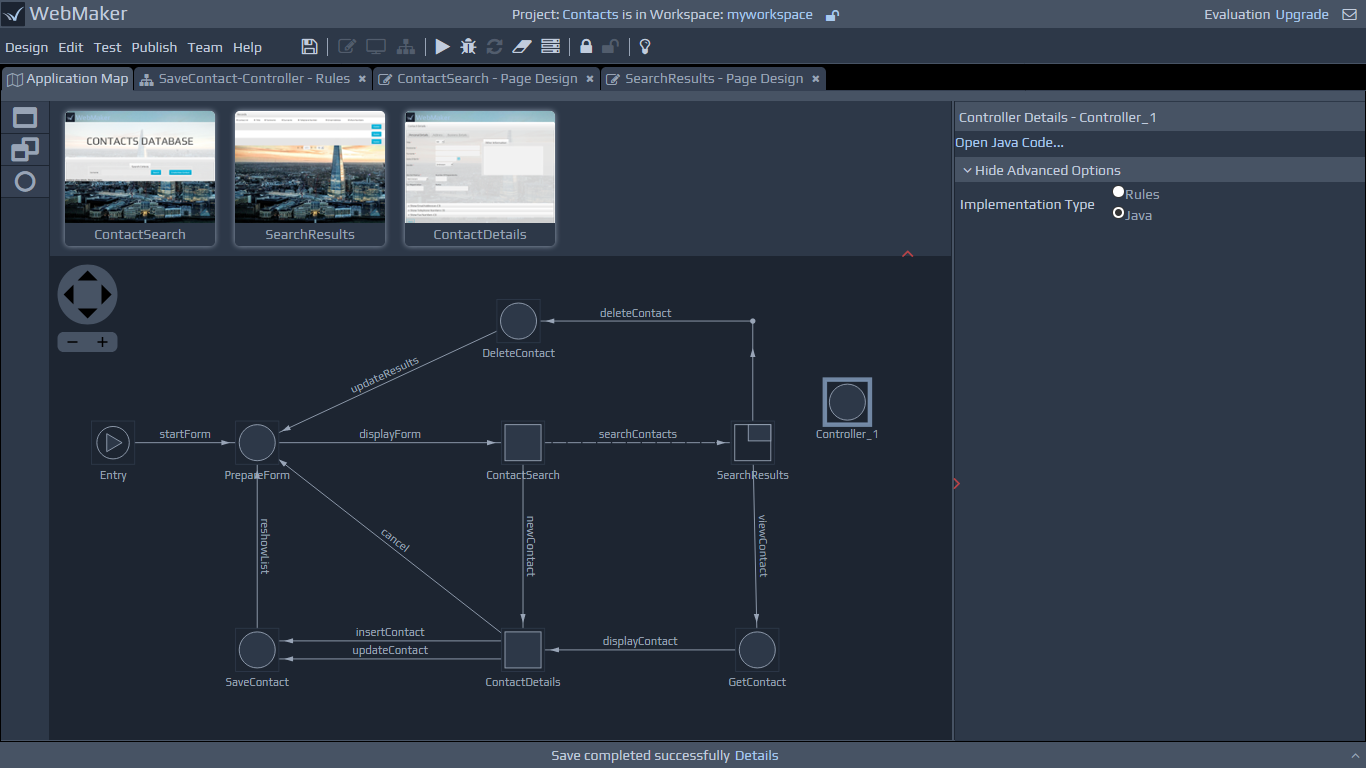
You can organise the source code for Java Controllers by using the Java Code Location and Package Name entries under Application Defaults - Advanced Options on the right hand panel of the Application Map.

Controller Architecture
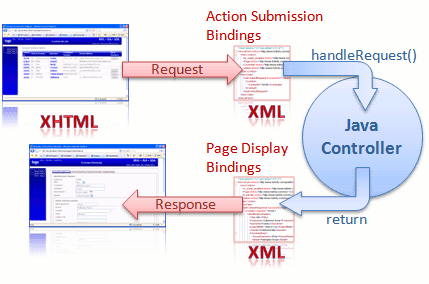
Before we start to explore the contents of Java Controllers, it is worth recapping on some of the relevant components within the WebMaker Runtime architecture. The diagram below provides a high-level view of this architecture, focusing on the data bindings and the flow of incoming and outgoing information between client (Browser) and server.
 WebMaker provides the ability to bind the data within a web page in two directions. When information is submitted from the browser, an arbitrary XML document structure can be populated with the information contained within the submitted XHTML form. When a page is sent to the browser, another arbitrary XML document structure on the server can be used to bind XML fields to HTML fields on the web page. This bi-directional binding can be performed graphically within the WebMaker Page Design - Bindings tab. Controllers on the server handle the requests and also compose the response structures that are then transformed by WebMaker to produce the HTML response to the Browser.
Java Controllers provide the ability to write Java code to perform the desired tasks on the server. What you do here is dependent on your application scenario, technology standards and architecture.
The information between the client and server is bound for you. Therefore, by the time you receive the information it will be in the following format:
<?xml version="1.0" encoding="UTF-8"?>
<mvc:eForm xmlns="http://www.hyfinity.com/xplatform" xmlns:mvc="http://www.hyfinity.com/mvc" xmlns:xg="http://www.hyfinity.com/xgate">
    <mvc:Control>
        <Page xmlns="http://www.hyfinity.com/mvc">ContactDetails.xsl</Page>
        <Controller xmlns="http://www.hyfinity.com/mvc">mvc-Contacts-JGetContactsList-Controller</Controller>
        <action xmlns="http://www.hyfinity.com/mvc">getJContactDetails</action>
        <unbound_param xmlns="http://www.hyfinity.com/mvc">value</unbound_param>
    </mvc:Control>
    <mvc:Data>
        <GetContactRequest Successful="" Version="" xmlns="http://www.hyfinity.com/schemas/tutorial" xmlns:demo="http://www.hyfinity.com/schemas">
            <Contact>
                <ContactId>10346</ContactId>
            </Contact>
        </GetContactRequest>
    </mvc:Data>
</mvc:eForm>
The response format will be the same and the complete wrapped document is transformed to produce the response pages, as defined within WebMaker. Please remember that any submitted elements that failed to bind will be placed under the Control/unbound_param element. Let's now return to an example Java Controller generated by WebMaker:
package com.hyfinity.controller.Java;

import com.hyfinity.utils.xml.XDocument;
import com.hyfinity.xplatform.JController;
import Java.util.Map;
import Java.io.File;

public class JGetContactsList extends JController
{
    /**
     * Process the request for this controller, and return the response data needed
     * to display the next screen.
     * @param data The bound XML data submitted from the browser.
     * @param control A name to value mapping of all the other (non bound) parameters submitted.
     * @param action The name of the action called from the browser.
     * @return The XML data needed to show the next screen.
     */
    public XDocument handleRequest(XDocument data, Map control, String action)
    {
        /* Set the name of the next page to display. This is the same name as specified in the Application Map tab. */
        setNextPage("ContactDetails");
        /* Perform processing of your choice to compose the response document. This may include calls to other
         * web services, databases, etc. In this scenario, a response fragment from the Contact web service is
         * being parsed from the file system to create the Data element within the WebMaker wrapper. See the tutorials
         * for more background information on the contacts web services.
         */
        XDocument contactDetails = new XDocument(new File("c:\\myjprojects\\example\\GetContactResponse.xml"));
        /* Return the response data, which will be wrapped for us to produce the full message format that will
         * be transformed to produce the next screen.
         */
        return contactDetails;
    }
}
Within each Java Controller, it is the handleRequest method that needs to be implemented to perform the required functionality. The above code fragment is simply loading in some data from a file, and returning it.
Important Note: The data incoming parameter contains the XML contents contained within the first element found within the eForm/Data element in the request message. This would be the GetContactRequestinformation in the above example message. The XDocument object provides a wrapper around a standard W3C DOM, providing some convenience functions. Please refer to the Java-doc for more details. The control map provides a read-only view of the unbound parameters submitted from the page, that were therefore placed into the eForm/Control section of the XML message. This maps the parameter names to their values and, within the example message above, would just contain the
unbound_paramentry. The final parameter contains the name of the action that was invoked from the page. This will be one of the names defined against the links on the Application Map canvas. When complete, the method needs to return the details required to display the next page. These details need to be in XML format and will be placed within the eForm/Data element of the full wrapped XML message returned from the controller. The following is an example response message, prepared to be sent back to the browser. This response message should resemble the same structure that was used for the Page Display Bindings within the WebMaker Page Design screen. You should also indicate the next page information in order to enable WebMaker to identify the transform to apply to the response message to produce the next page. The JController super class provides a helper method to do this, along with other useful functions. Please see the Java-doc for more details. In this scenario, a response fragment from the Contact web service is being parsed from the file system to create the Data element within the WebMaker wrapper. You can perform processing of your choice to compose the response document. This may include calls to other web services, databases, etc.
<?xml version="1.0" encoding="UTF-8"?>
<eForm xmlns="http://www.hyfinity.com/xplatform" xmlns:mvc="http://www.hyfinity.com/mvc" xmlns:xg="http://www.hyfinity.com/xgate">
    <Control>
        <is_script_enabled xmlns="http://www.hyfinity.com/mvc">true</is_script_enabled>
        <Page xmlns="http://www.hyfinity.com/mvc">ContactDetails.xsl</Page>
        <Controller xmlns="http://www.hyfinity.com/mvc">mvc-Contacts-JGetContactsList-Controller</Controller>
        <action xmlns="http://www.hyfinity.com/mvc">getJContactDetails</action>
    </Control>
    <Data>
        <GetContactResponse Successful="true" Version="1-0" xmlns="http://www.hyfinity.com/schemas/tutorial">
            <Contact ContactId="10346">
                <IdentificationDetails>
                    <Title>Mrs</Title>
                    <Forename>Catherine Anne</Forename>
                    <Surname>Franks</Surname>
                    <DateOfBirth>1968-01-02</DateOfBirth>
                    <Gender>Indeterminate</Gender>
                    <HomeAddress>
                        <HouseNameNo>564a</HouseNameNo>
                        <Street>Pellington Road</Street>
                        <Locality/>
                        <Town>Chester</Town>
                        <CountyArea/>
                        <Postcode/>
                        <Country/>
                    </HomeAddress>
                </IdentificationDetails>
                <PersonalDetails>
                    <MaritalStatus>d</MaritalStatus>
                    <NumberOfDependants/>
                    <CarRegistration/>
                    <Notes/>
                    <OtherInformation/>
                </PersonalDetails>
                <BusinessDetails>
                    <OrganisationName>Burchell</OrganisationName>
                    <NationalInsuranceNumber/>
                    <TaxReference/>
                    <Salary/>
                    <PaymentFrequency>W</PaymentFrequency>
                    <OtherInformation/>
                </BusinessDetails>
                <ContactNumbers>
                    <EmailAddresses>
                        <EmailAddress Preferred="yes" Use="home">
                            <Email>cathy.franks@example.com</Email>
                        </EmailAddress>
                        <EmailAddress Preferred="no" Use="work">
                            <Email>catherine.franks@hyfinity.com</Email>
                        </EmailAddress>
                        <EmailAddress Preferred="no" Use="">
                            <Email/>
                        </EmailAddress>
                    </EmailAddresses>
                    <TelephoneNumbers>
                        <TelephoneNumber Preferred="yes" Use="work">
                            <TelCountryCode>44</TelCountryCode>
                            <TelNationalNumber>121 456 7890</TelNationalNumber>
                        </TelephoneNumber>
                        <TelephoneNumber Preferred="no" Use="work">
                            <TelCountryCode>44</TelCountryCode>
                            <TelNationalNumber>121 456 5432</TelNationalNumber>
                        </TelephoneNumber>
                        <TelephoneNumber Preferred="no" Use="">
                            <TelCountryCode/>
                            <TelNationalNumber/>
                        </TelephoneNumber>
                    </TelephoneNumbers>
                    <FaxNumbers>
                        <FaxNumber Preferred="no" Use="">
                            <FaxCountryCode/>
                            <FaxNationalNumber/>
                        </FaxNumber>
                        <FaxNumber Preferred="no" Use="">
                            <FaxCountryCode/>
                            <FaxNationalNumber/>
                        </FaxNumber>
                        <FaxNumber Preferred="no" Use="">
                            <FaxCountryCode/>
                            <FaxNationalNumber/>
                        </FaxNumber>
                    </FaxNumbers>
                </ContactNumbers>
            </Contact>
        </GetContactResponse>
    </Data>
</eForm>
Compiling and Running Java Controllers
You can use the in-built WebMaker Editor or a Java Development tool of your choice to author and compile the Java classes for each controller. You will need to ensure that the WebMaker xplatform.jar file is on your classpath for the code to compile successfully. This jar is located within the {Installer Location}\design\tomcat-design\common\lib directory of a standard WebMaker installation.
Once compiled, you can place the class within the J2EE container deployment path. For the default WebMaker installation and sample projects, this will reside in the directory {Installer Location}\users\{user name}\{workspace name}\mvc\{project name}\webapp\WEB-INF\classes. Please remember to use the full named package structure. Alternatively, you can place your compiled classes within a JAR file in the jars directory, as you would with any other Java web application ...\WEB-INF\lib.
Java docs
You can use the following link to access the JController Java doc. From here you can see more details for the XDocumentand other helper classes. If your Java code is placed in the correct location, you should be able to use the Run Test action in the WebMaker Studio, which will deploy the Java into the Test environment. You can use the Debugger to check execution details via the View Debugger tab. This will also show details of any errors, including the inability to locate the controller or inability to execute the controller, etc.